October 2026 · Shop tips
Brake Booster Repair: Check the Simple Causes First
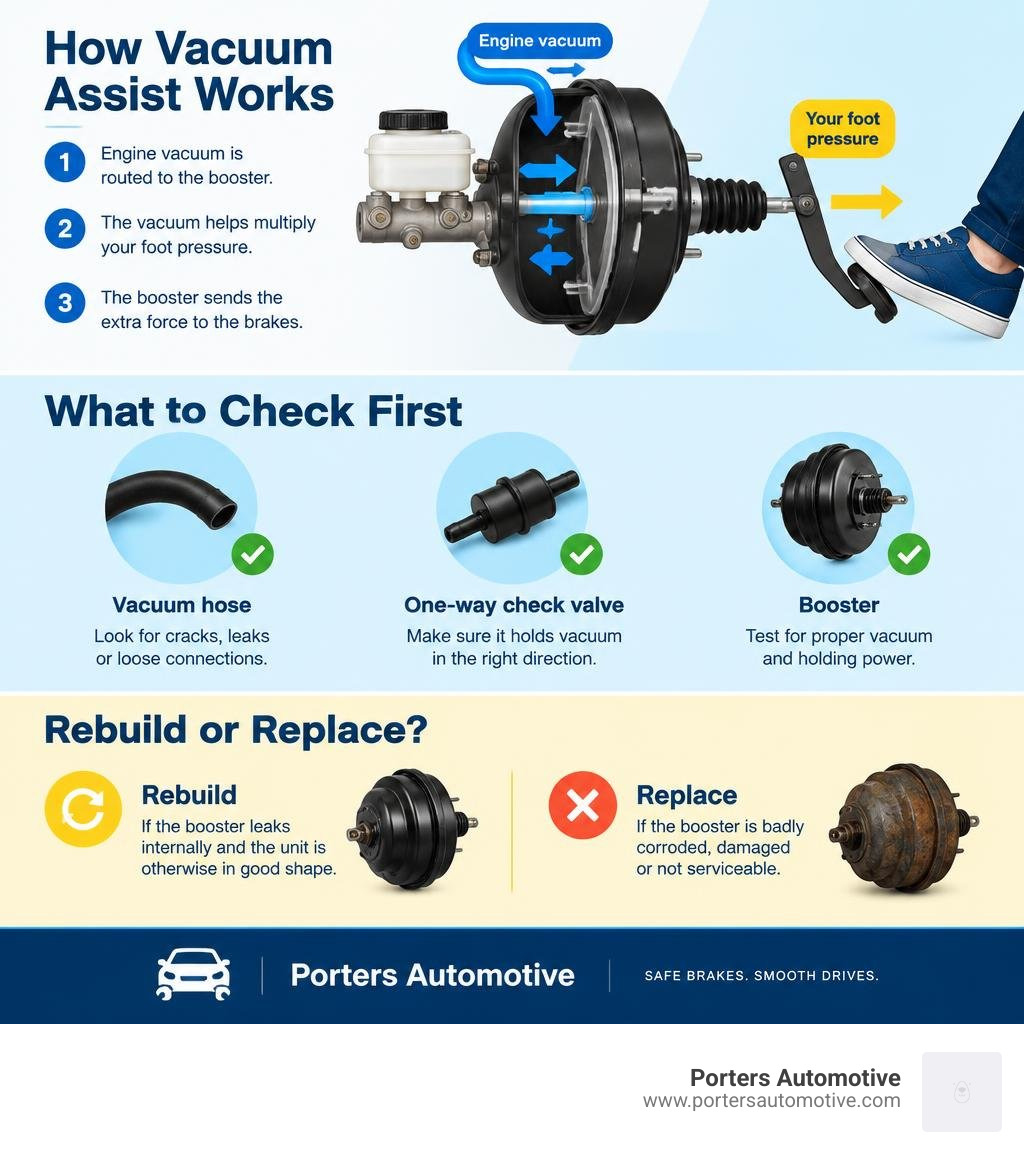
A stiff brake pedal can mean the booster has lost vacuum assist, but the booster itself may not be the problem. With the engine off, press the pedal several times, then hold it down and start the engine. The pedal should drop slightly. If it does not, have the vacuum hose, one-way check valve, and booster tested before replacing parts.
A failed hose or check valve may be a simpler fix. If the booster leaks internally, a sound, serviceable unit may be rebuilt; a badly corroded or damaged one needs replacement. If braking takes more effort than usual, do not keep driving. Have the vehicle inspected.
I'm Heath Porter, owner of Porters Automotive, and I've worked in automotive service since 2006. I'll walk you through brake booster repair, from the first checks to choosing a safe fix.
Diagnosing Symptoms of a Failing Brake Booster
When power assist drops out, the physical effort required to stop your car jumps dramatically. Instead of a smooth, responsive pedal that yields under gentle foot pressure, pressing the pedal feels like stepping directly onto a wooden block. Recognizing early warning signs helps you address problems before complete failure occurs.
The most common symptoms of vacuum booster malfunction include:
- Rock-Hard Brake Pedal: The primary warning sign. Without sufficient vacuum pressure to assist your mechanical leverage, your leg muscles do all the heavy lifting.
- Hissing Noises During Braking: If you hear an audible whoosh or continuous hiss under the dashboard when depressing the brake pedal, the internal rubber diaphragm or rear push rod seal has likely split.
- Rough Engine Idle or Stalling: Because traditional boosters draw engine vacuum directly from the intake manifold, an internal diaphragm tear creates a direct vacuum leak. Applying the brakes introduces unmetered air into the intake, causing rough idling, engine stumbling, or stalling at intersections.
- Engine Codes: Unmetered air entering via a leaking booster can trigger diagnostic trouble codes such as P0171 or P0174 (System Too Lean).
- Extended Stopping Distances: When pedal effort spikes, driver reaction time slows and braking force diminishes, extending the distance needed to stop.
On modern hybrid and electronic braking platforms, booster pump assemblies use internal pressure sensors rather than pure engine manifold vacuum. A malfunction in these integrated assemblies can illuminate ABS, TRAC, and stability control warnings. For example, a Toyota Customer Support Program bulletin on booster malfunction highlighted internal leaks that triggered trouble codes C1391, C1252, C1256, and C1253 across specific Prius models.
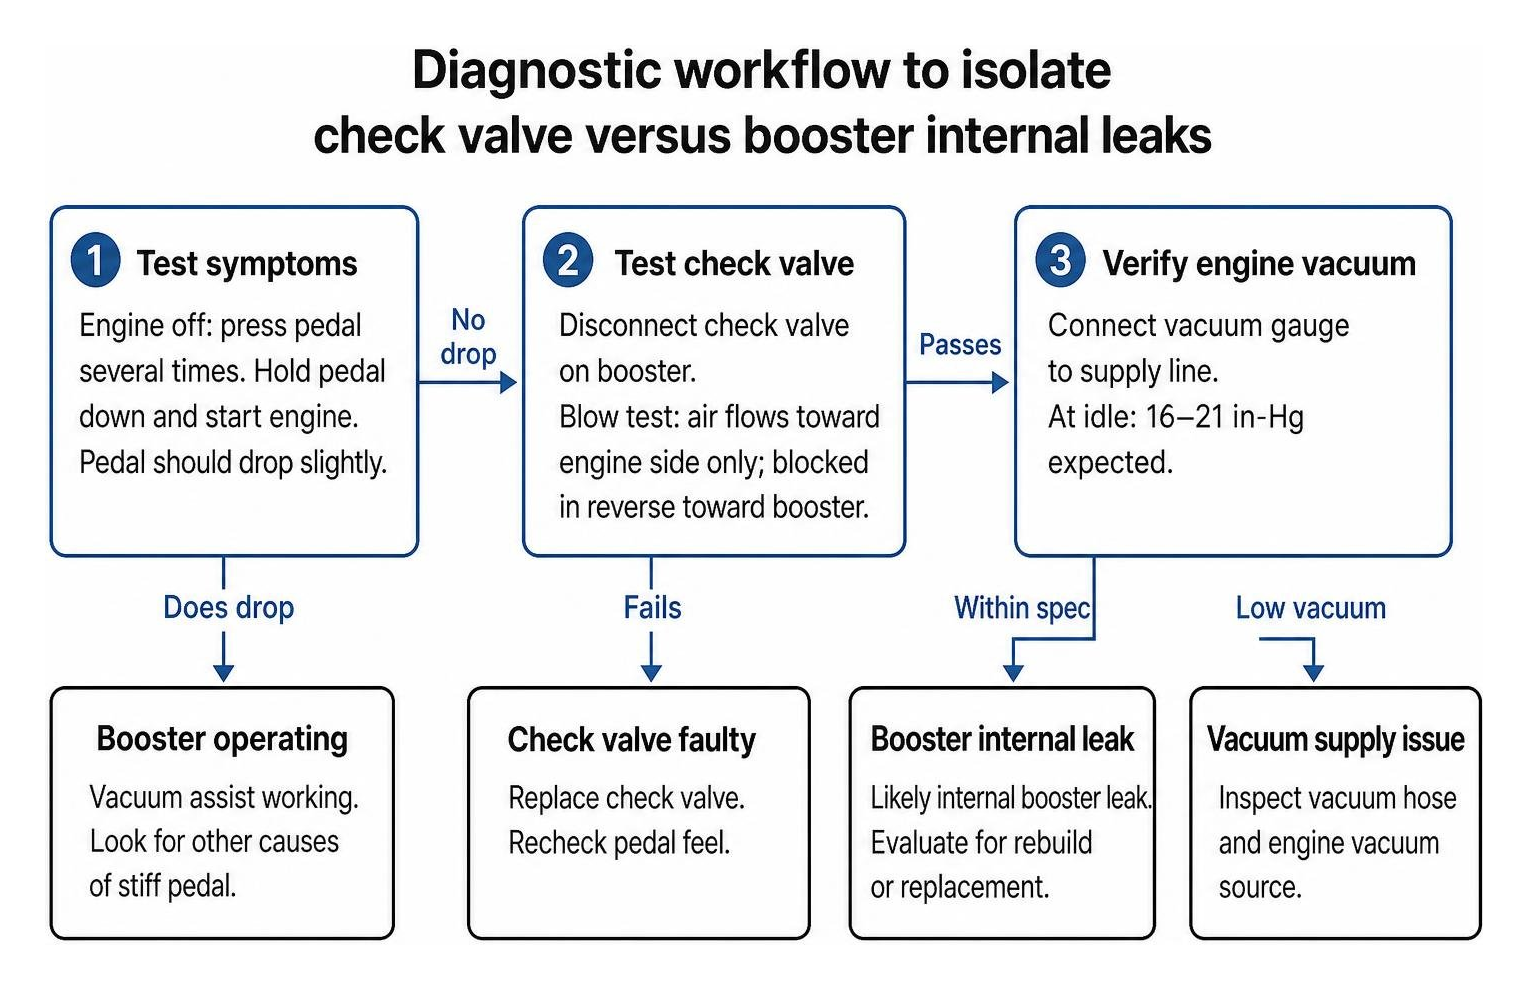
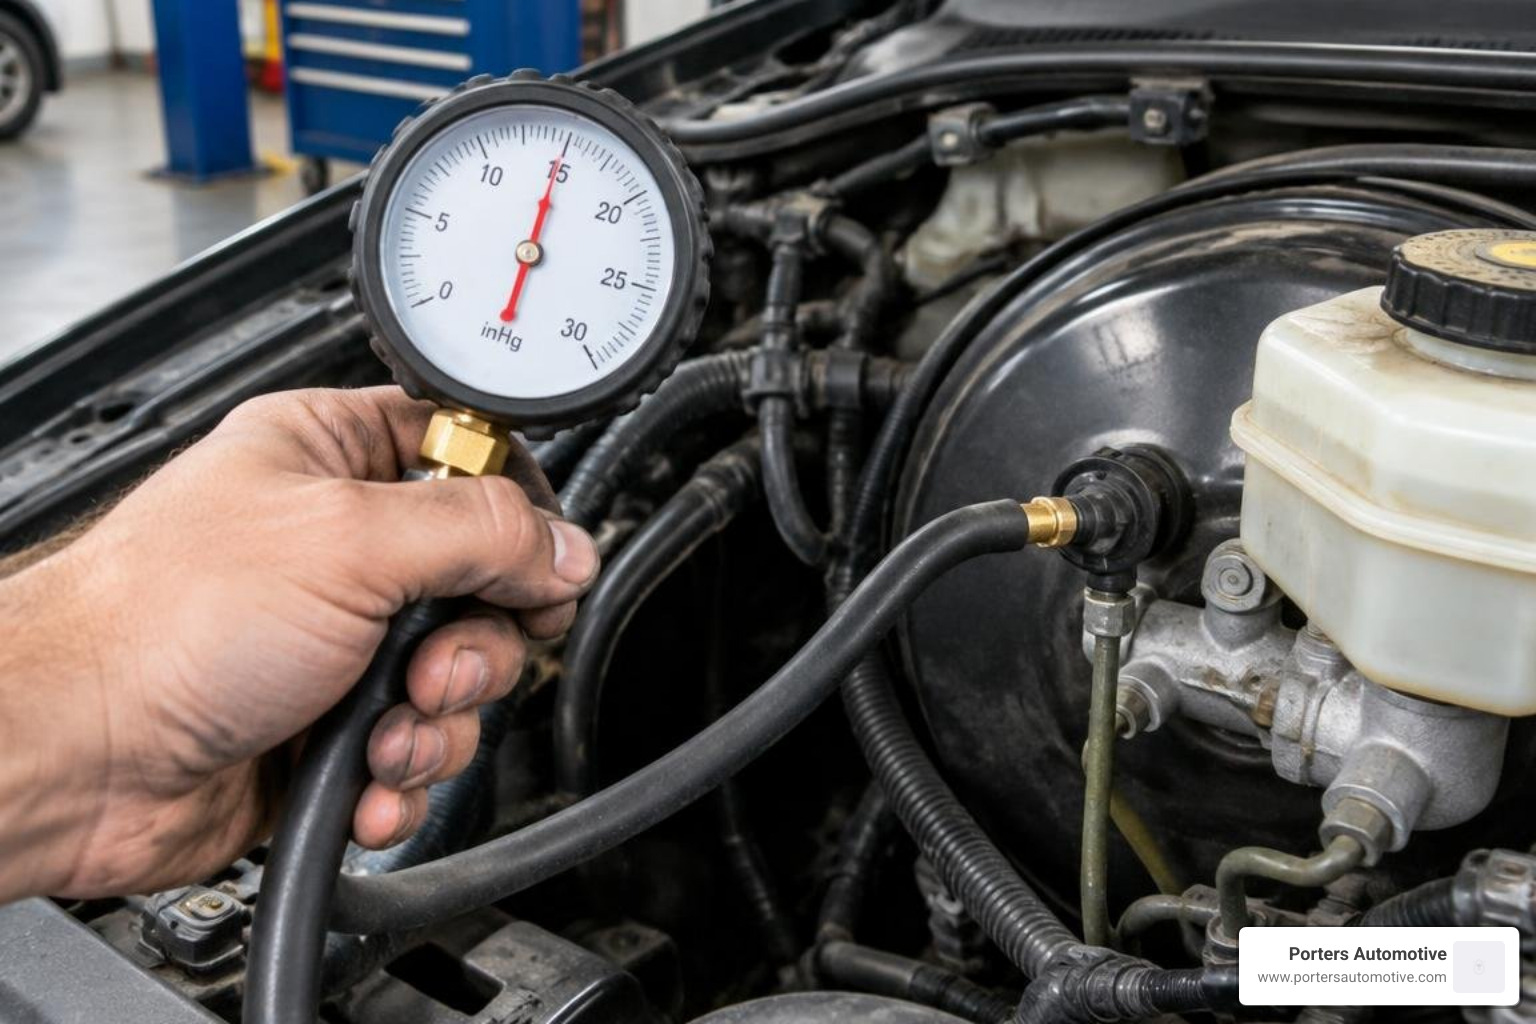
To isolate a conventional vacuum failure, start with a simple physical test. Disconnect the plastic check valve located on the booster shell. Blow into both ends: air should flow freely toward the engine side but remain blocked in reverse toward the booster. If the check valve passes, connect a handheld vacuum gauge to the supply line to confirm the engine produces 16 to 21 inches of mercury (in-Hg) at idle before suspecting internal booster failure.
Assessing Booster Rebuildability and Critical Failure Points
Before diving into a complete overhaul, determine whether the booster housing and internal core are sound enough to safely rebuild.
Severe rust and moisture damage are primary reasons to reject a core. Moisture can enter through degraded outer seals, pooling at the bottom of the steel shell. A prime example of this occurred when an NHTSA safety recall report on booster housing corrosion identified over 290,000 SUVs at risk of brake failure due to moisture trapped beneath external decorative rubber sleeves, which corroded the metal shell. If you find deep pitting, structural perforations, or metal flakes inside the housing, discard the unit and install a new replacement.
Another common failure source is a leaking rear master cylinder seal. When hydraulic fluid bypasses the secondary seal, it drips directly into the front chamber of the booster. Brake fluid dissolves rubber diaphragms, washes away protective silicone lubricants, and accelerates internal corrosion.
Common Failure Points: Diaphragms, Seals, and Check Valves
Inside a vacuum booster, several components wear down over time:
- Main Rubber Diaphragm: Separates the constant-vacuum chamber from the variable-pressure chamber. Dry climates accelerate rubber dry-rot, while brake fluid exposure causes swelling, softening, and tearing.
- Poppet and Air Control Valves: Located inside the central hub assembly. These route atmospheric air into the rear chamber when you depress the pedal. If their elastomeric seats harden, atmospheric air bleeds into the vacuum chamber continuously.
- Reaction Disc: A small, thick rubber disc situated between the booster output push rod and the central hub. If this disc slips out of alignment or degrades, pedal feel becomes erratic or drops suddenly.
- Push Rod and Hub Seals: Prevent air from entering along the input shaft under the dashboard.
DIY vs. Professional Brake Booster Repair Services
Deciding whether to rebuild the unit yourself, hire a specialty rebuilding shop, or purchase a replacement depends on part availability, tooling, and vehicle age.
| Factor | DIY Rebuilding | Professional Rebuilding Services | Complete Unit Replacement |
|---|---|---|---|
| Typical Cost | $40 – $150 (Kit only) | $150 – $450 | $250 – $900+ |
| Turnaround Time | 4 – 8 hours of labor | 1 – 3 weeks | 1 – 3 days (stock dependent) |
| Tools Required | Heavy-duty clamps, seal drivers, vacuum pump | Specialized CNC equipment, blast cabinets, factory crimpers | Standard metric/SAE hand tools, flare nut wrenches |
| Best Suited For | Common vintage cars with available kits | Rare, obsolete, matching-numbers classics | Modern passenger vehicles with available OEM units |
| Safety Risk | High (Handling pre-loaded main spring) | Low (Handled by experienced rebuilders) | Low (Pre-assembled, factory-tested unit) |
For modern daily drivers, installing a complete remanufactured or brand-new assembly is generally the most practical choice. However, for classic, vintage, and matching-numbers muscle cars where original replacements are no longer manufactured, sending the core to an experienced rebuilder provides custom machining and specialized plating to preserve originality.
The Complete Guide to Brake Booster Repair and Overhaul
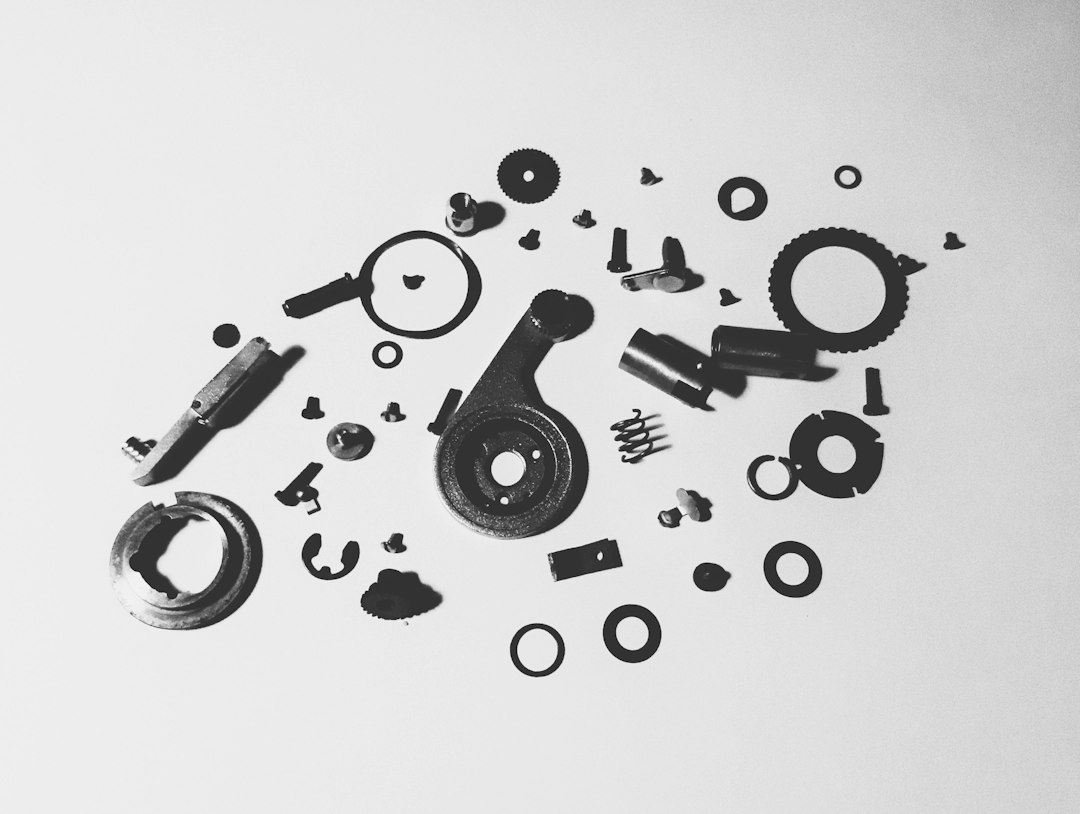
If you have confirmed that your booster is rebuildable and have sourced an exact OEM-spec rebuild kit, proceed with methodical bench servicing.
Specialized Tools and Safety Equipment for Brake Booster Repair
Servicing a booster requires safety precautions. The internal return spring holds substantial mechanical energy inside the shell.
- Safety Goggles and Nitrile Gloves: Protect your eyes and skin from flying components and caustic brake fluid residue.
- Heavy-Duty Bench Vise and Custom Clamps: Securely compress the two housing halves during disassembly and reassembly.
- Brake Line Flare Nut Wrenches: Prevent stripping hydraulic fittings when moving the master cylinder.
- Handheld Vacuum Pump with Gauge: Essential for pre-assembly and post-assembly bench testing.
- Depth Caliper / Push Rod Adjustment Gauge: Accurately set the clearance between the booster output pin and master cylinder piston.
Step-by-Step Disassembly, Cleaning, and Seal Replacement
- Index the Housing: Before loosening fasteners or crimps, scribe a distinct alignment line across the front and rear steel shells. This ensures all mounting studs and vacuum ports return to their exact factory clocking upon reassembly.
- Relieve Main Spring Tension: Mount the booster into an arbor press or clamp fixture. Compress the shells slightly to take tension off the locking tabs. Slowly rotate the housing halves (or carefully drill out stamped factory pinches if working on sealed drums) and gradually release clamp pressure so the internal return spring expands safely without shooting apart.
- Extract Internal Components: Remove the central power piston hub, diaphragm assembly, air valve springs, and reaction disc. Note the exact sequence and orientation of every washer and seal.
- Cleaning and Inspection: Wash steel shells thoroughly in solvent and dry with compressed air. Strip light surface rust with fine glass-bead blasting, keeping abrasive media far away from internal sliding bores. Inspect the interior metal walls for deep scoring or pitting.
- Replace Wear Parts: Fit the new rubber diaphragm onto the plastic or aluminum hub, ensuring the outer sealing bead seats evenly in its groove. Replace the front push rod seal, rear hub atmospheric seal, and vacuum check valve grommet. Lubricate all moving seals and contact bores with high-purity, petroleum-free silicone brake grease.
Reassembly and Push Rod Adjustment
Assemble the clean internal hub, return spring, and new diaphragm into the rear housing. Compress the front and rear shells using your press or fixture, verifying that the diaphragm outer bead stays aligned in the outer channel. Secure the halves by engaging the twist-lock tabs or installing structural aluminum snap rivets where factory crimps were removed.
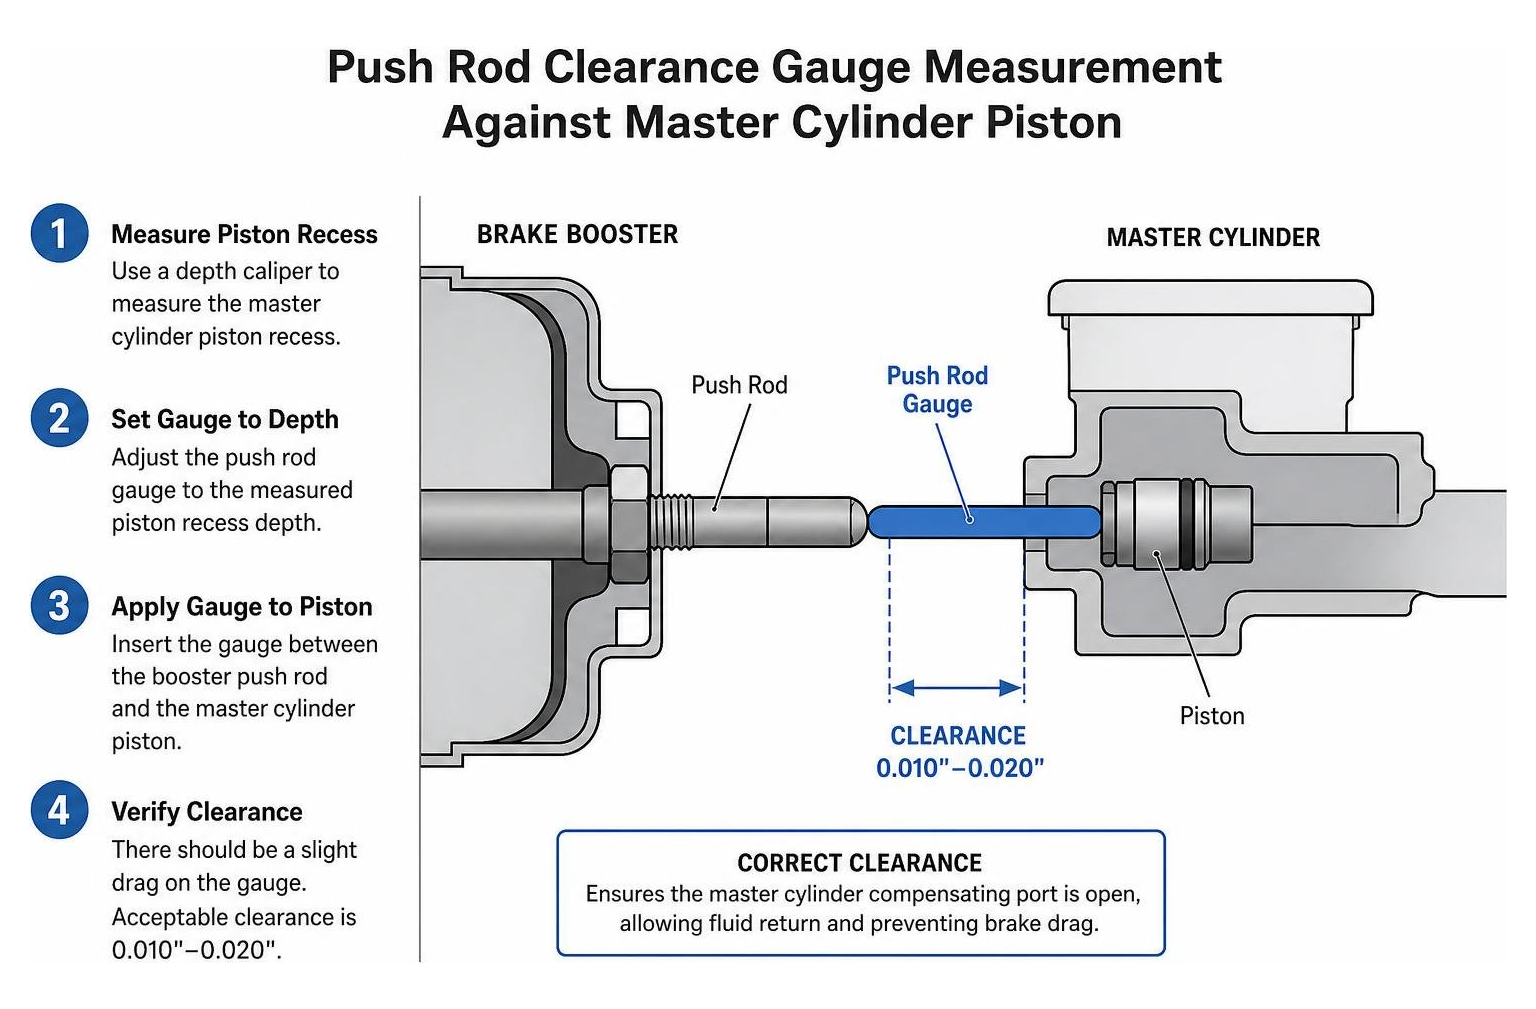
Next, calibrate output push rod depth. If the push rod extends too far, it keeps the master cylinder compensating port partially blocked, preventing fluid return and causing the brakes to drag and overheat. If set too short, pedal travel increases before the brakes engage. Measure the master cylinder piston recess with a depth caliper and adjust the booster push rod screw to achieve the factory-specified clearance—typically between 0.010 and 0.020 inches of free play.
Housing Restoration, Rust Prevention, and Pre-Installation Testing
Once the mechanical components are assembled, protect the bare steel housing from road salt, ambient moisture, and occasional brake fluid spills.
Clean the exterior shell with grease-removing prep solvent. Apply two light coats of a two-component (2K) epoxy primer to establish an airtight moisture barrier. Once the primer flashes, spray two coats of chemical-resistant semi-gloss or chassis black paint. Avoid heavy paint buildup on the mounting faces and check valve port, as excess paint can compromise vacuum seals.
Before mounting the unit back onto the vehicle firewall, conduct a bench vacuum decay test:
- Insert the check valve into the booster grommet.
- Connect a manual vacuum pump to the valve and evacuate the booster to 20 in-Hg.
- Let the booster sit undisturbed for five minutes. The vacuum gauge should register zero noticeable drop.
- Depress the input push rod manually. The internal valve should release vacuum smoothly, and the output push rod should extend cleanly without binding.
Rebuilding Obsolete and Specialty Boosters
Restoring rare or obsolete brake assist units presents unique challenges because standard auto parts stores rarely stock drop-in replacements.
Servicing Vintage Bendix Treadle-Vac and ATE Units
Mid-century classics often rely on early integrated power brake units like the Bendix Treadle-Vac. As documented in a classic Bendix Treadle-Vac restoration guide, these single-circuit designs combine the vacuum cylinder, control valve, and hydraulic master cylinder into a single casting.
Servicing these vintage units requires handling leather vacuum piston packings, miniature poppet springs, and internal compensating valves. Leather packings require conditioning with dedicated lubricants (such as neat's-foot oil) to create an airtight seal against the large cylinder wall without binding.
Similarly, vintage European sports car boosters (such as vintage ATE units) feature sealed drum halves joined by factory pinches rather than threaded lock rings. Rebuilding them involves drilling out the original pinches, smoothing the lip on a lathe or with precision hand files, and resealing the housing using countersunk structural snap rivets coated in fuel-and-oil-resistant sealant.
Hydraulic Assist and Hydraulic Booster Teardown
Certain heavy-duty trucks and classic European luxury cars use hydraulic brake boosters (such as Hydro-Boost or ATE H-series units) instead of vacuum systems. These systems tap high-pressure fluid directly from the power steering pump to provide pedal assist.
A detailed H31 hydraulic booster breakdown illustrates how these units utilize precision spool valves, internal servo pistons, and high-pressure nitrogen accumulators. Common failure points include leaks from the low-pressure end cap seal and degradation of internal O-rings, which allow power steering fluid (ATF or hydraulic mineral oil) to seep down the pedal shaft into the driver footwell.
When overhauling hydraulic boosters, keep the following in mind:
- Fluid Cleanliness: Thoroughly flush and bleed the power steering hydraulic circuit. Contaminants can score the mirror-polished spool valves, rendering the unit unserviceable.
- Non-Renewable High-Pressure Seals: While external O-rings and low-pressure end cap seals can be replaced, damaged internal hard-Teflon servo piston rings usually require replacing the entire sub-assembly.
- Accumulator Pressure: Exercise extreme caution around the screw-in nitrogen accumulator canister, which stores hydraulic pressure up to several hundred PSI. Depressurize the system completely by pumping the brake pedal 20 to 30 times with the engine off before loosening hydraulic lines.
Frequently Asked Questions About Brake Booster Servicing
How do I know if my brake booster is repairable or needs complete replacement?
A booster is rebuildable if its structural metal shell is free of deep rust perforations, the internal piston bore is smooth without heavy scoring, and an OEM-dimension rebuild kit is available. If the unit exhibits structural rust cracks, bent mounting studs, or extensive pitting along critical sealing faces, it must be replaced.
What causes a brake booster to fail prematurely?
The leading cause of premature failure is brake fluid leaking from a worn master cylinder rear seal into the booster vacuum chamber. Fluid degrades rubber diaphragms and internal valving. Operating in extreme, arid climates can also cause the rubber to dry-rot, while repeated engine backfires through the intake can rupture diaphragms if the check valve fails.
Can I drive safely if my brake booster is leaking vacuum?
No. Driving with a compromised booster is dangerous. While the hydraulic brakes will still mechanically function, the pedal effort required to stop the vehicle multiplies substantially. In an emergency stopping situation, you may not be able to generate enough pedal pressure to stop safely, significantly increasing your collision risk.
Conclusion
Your vehicle's braking system is its most critical safety feature. A hard, unyielding pedal or an engine that stumbles every time you slow down indicates that your brake assist system needs attention. Whether resolving the issue requires replacing a brittle check valve, resealing an obsolete vintage unit, or installing a fresh assembly, addressing vacuum issues promptly restores responsive, predictable stopping power.
If your brake pedal feels stiff or you suspect a failing booster, let our experienced team inspect the system. Schedule an appointment at Porters Automotive today to keep your brakes operating smoothly and safely.