October 2026 · Shop tips
ABS Pump Reconditioning: Start With a Diagnosis
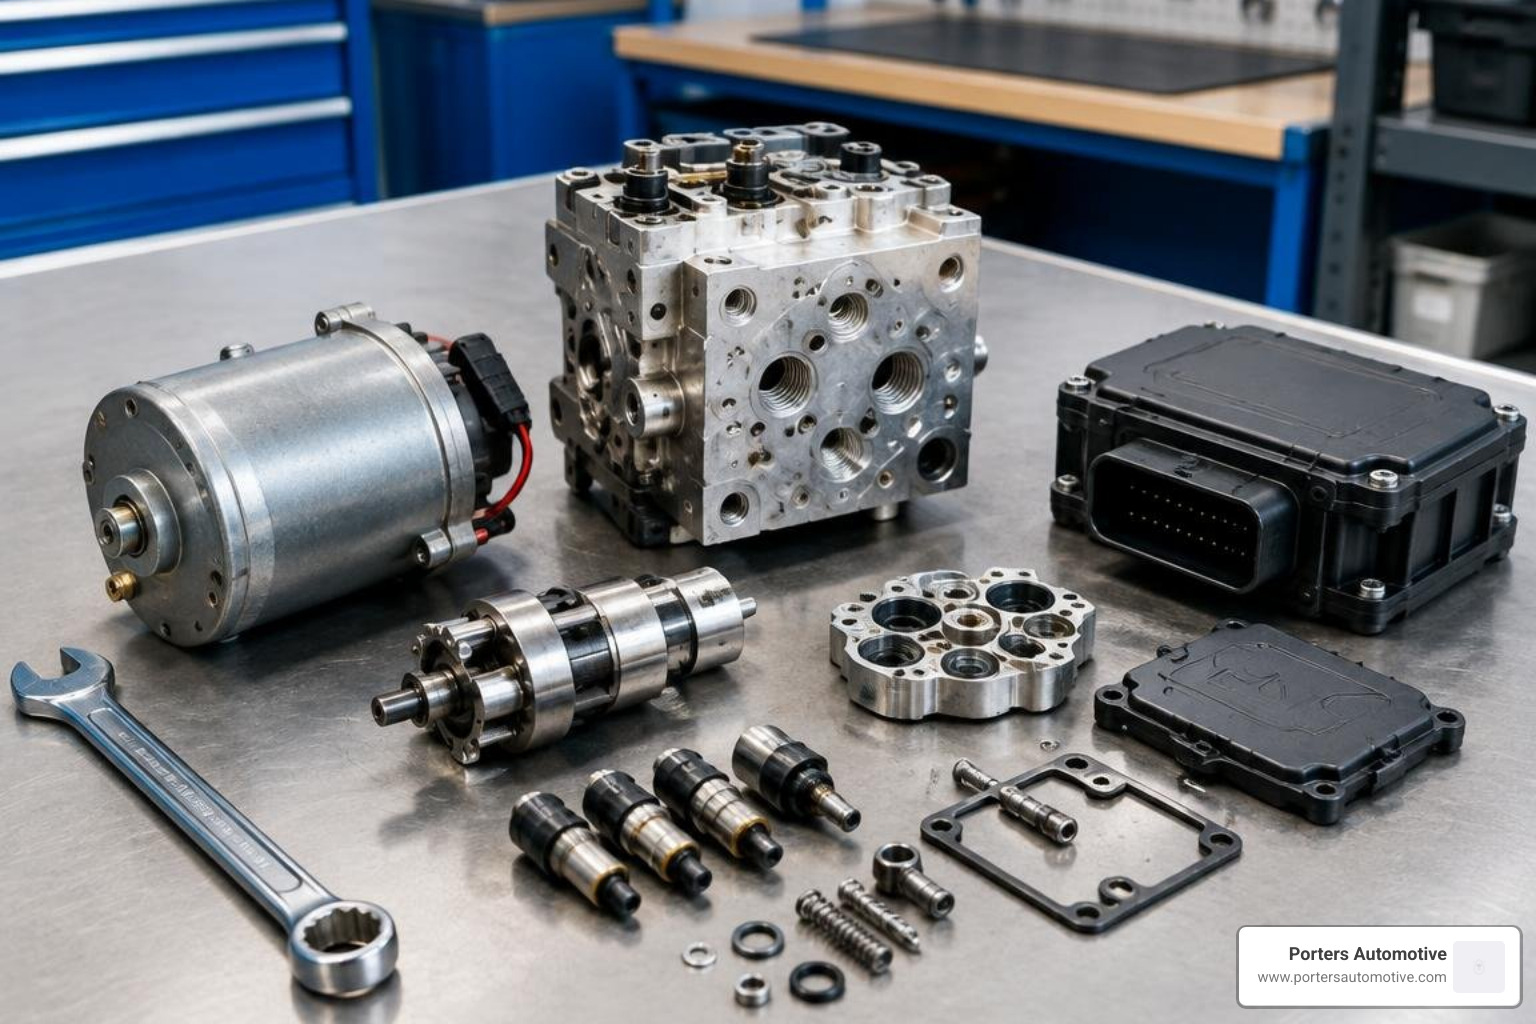
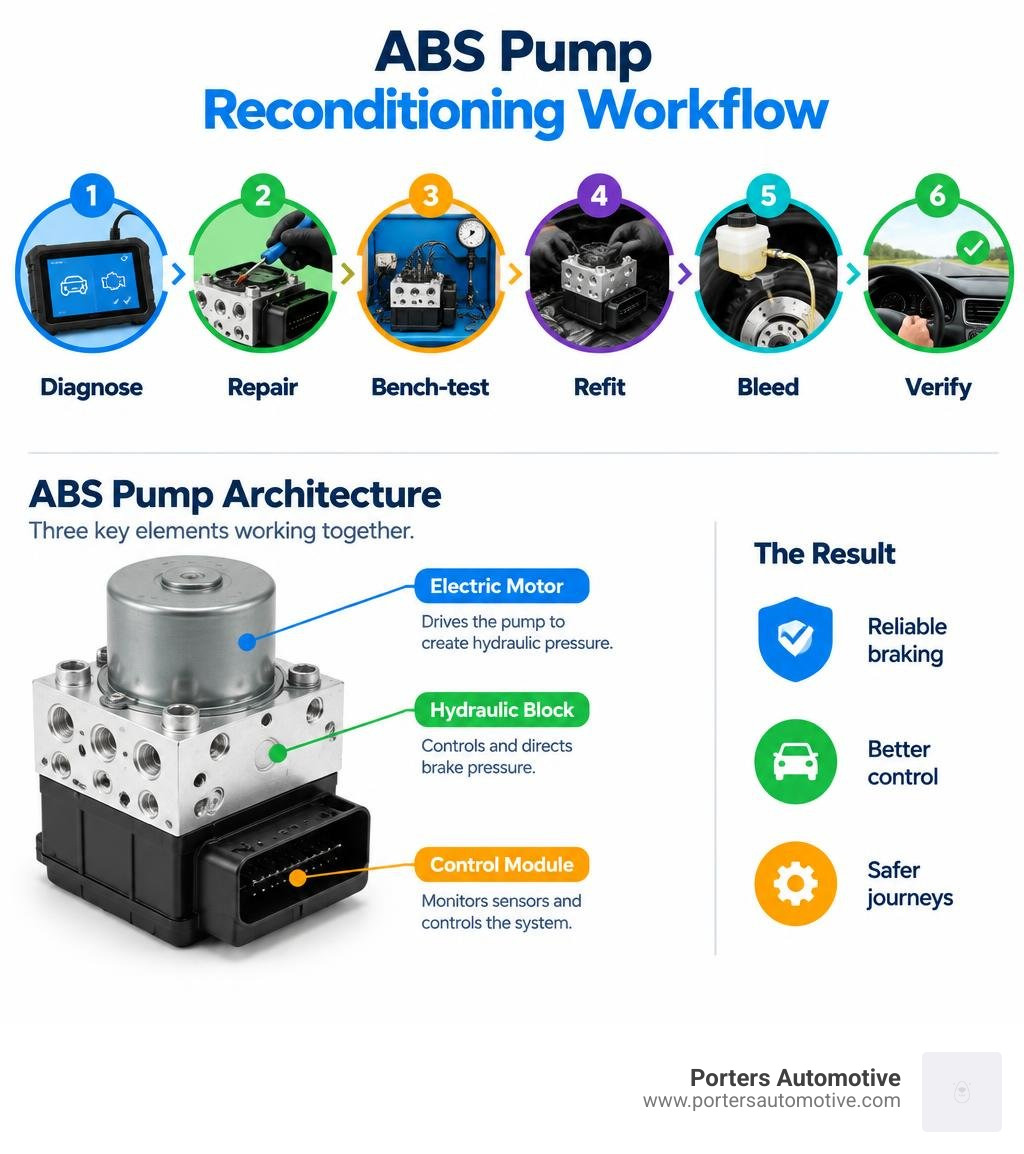
To recondition an ABS pump, first confirm the fault. Scan the ABS system for codes, then check the fuse, wiring, connectors, and brake fluid for problems outside the unit. If testing points to the pump or control module, have the faulty part repaired and bench-tested. After it is refitted, the brake system must be bled using the procedure for your vehicle; some models need a scan tool to cycle the ABS valves.
Do not open a sealed hydraulic block or drive with brake lines disconnected. A mistake here can leave air in the brakes or reduce braking performance.
I'm Heath Porter, owner of Porters Automotive. I've worked in vehicle service since 2006, and I approach abs pump reconditioning the same way I approach any brake repair: diagnose the fault before replacing parts, then verify the system works safely.
Understanding ABS Pump Architecture and Failure Symptoms
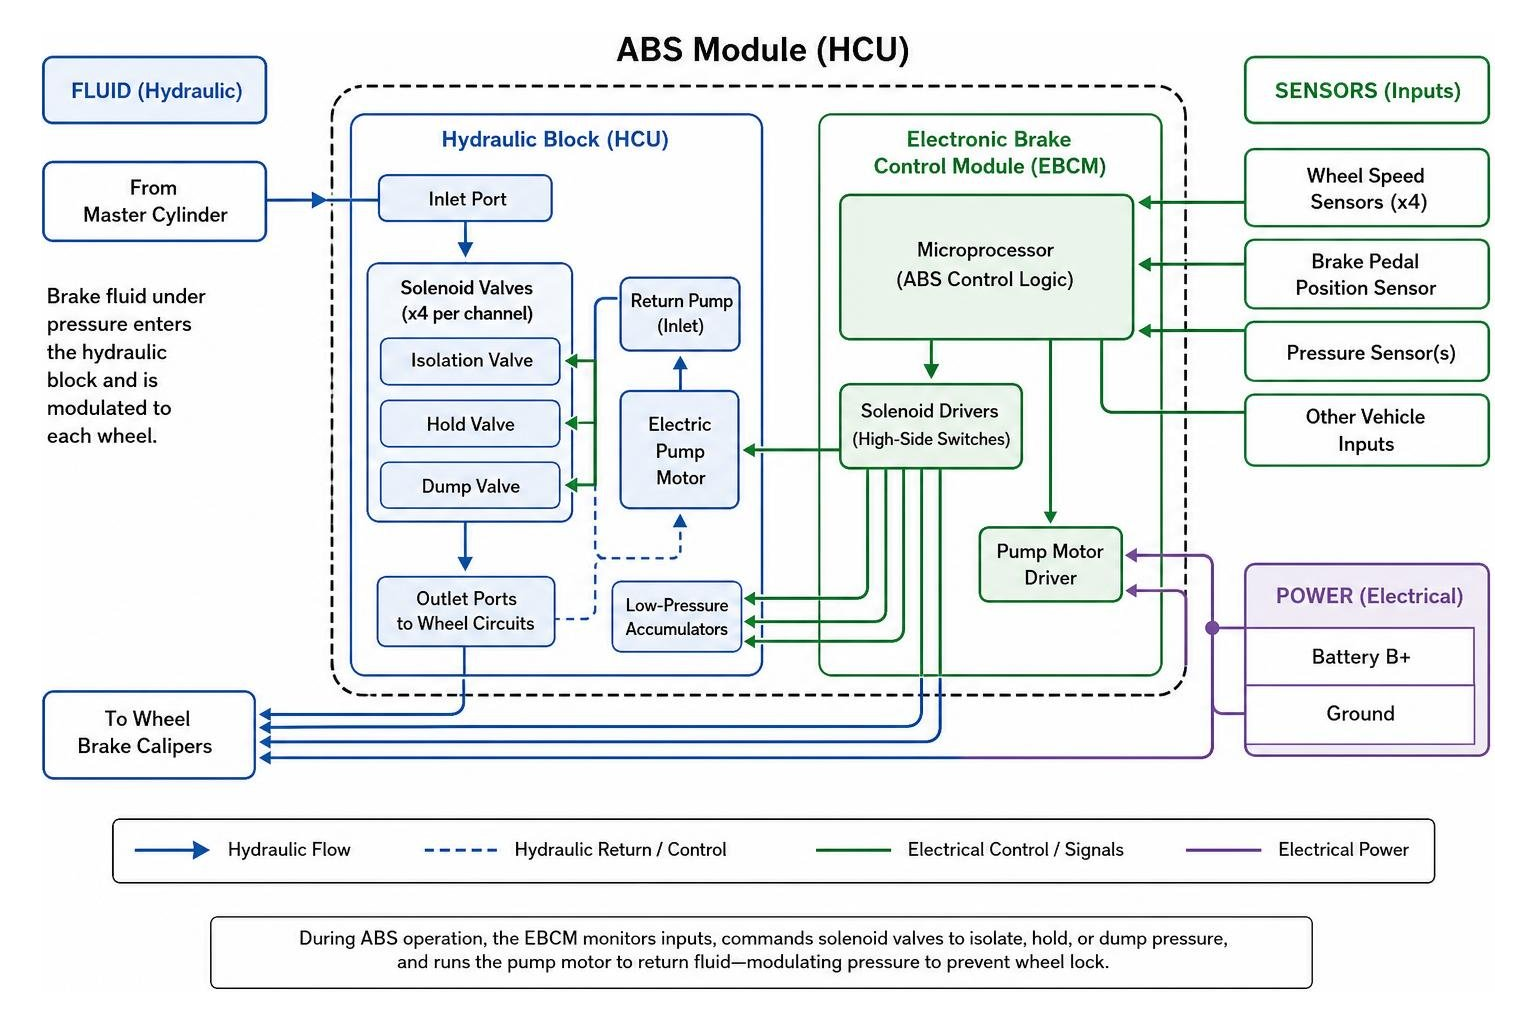
Modern anti-lock braking systems rely on a tightly integrated assembly that combines mechanical, hydraulic, and electronic engineering. While older platforms utilized separate components spread across the engine bay, modern engineering integrates these elements into a single assembly often referred to as the Hydraulic Control Unit (HCU). Understanding how these elements interact is the foundation of effective troubleshooting.
The core architecture consists of three primary elements:
- The Electronic Brake Control Module (EBCM): The computer brain that monitors sensor data, calculates wheel slip, and commands the mechanical actuators.
- The Electric Pump Motor: A high-torque DC motor that drives internal pistons to generate fluid return pressure during an ABS modulation event.
- The Hydraulic Block (HCU): An aluminum or cast manifold containing intricate fluid channels, internal accumulator chambers, and high-frequency solenoid valves that control fluid delivery to each caliper.
Early designs, such as classic Bosch ABS architecture, established the multi-channel layout that modern units still refine today. In these systems, fluid flows from the master cylinder through the hydraulic block to individual brake lines. When wheel lockup is detected, the solenoids rapidly isolate, hold, and release hydraulic pressure up to ten times per second while the return pump pushes evacuated fluid back upstream.
Anatomy of the Combined Module, Motor, and Hydraulic Unit
Inside the modern ABS assembly, the boundaries between electronics and hydraulics are precise:
- The Electronic Control Unit (EBCM): Mounted directly to the valve block, the EBCM houses a specialized printed circuit board (PCB) with microprocessors, transient voltage suppressors, and solid-state relays. The PCB interfaces directly with the solenoid coils through spring-loaded contacts or welded wire bonds.
- The DC Motor and Armature: The pump motor uses a wound armature, a segmented copper commutator, and heavy-duty carbon brushes. Because this motor experiences high inrush current during emergency stops, worn brushes, commutator grooving, or burned windings frequently cause system failure.
- The Hydraulic Valve Block: This aluminum block houses the internal pressure transducers, low-pressure accumulators, and pulse-width modulated (PWM) solenoid valves. It directs fluid under extreme pressures (often exceeding 1,500 psi) without external leakage.
Diagnostic Fault Codes and Common Failure Signs
When an ABS unit begins to fail, the symptoms can range from subtle warning lights to dramatic mechanical quirks. Drivers often report:
- Illuminated Dashboard Indicators: Simultaneous illumination of the ABS, Traction Control (ESP/TCS), and Brake warning lights.
- Spongy or Sinking Brake Pedal: Internal valve leakage or trapped air in the secondary circuit causing the pedal to travel abnormally close to the floorboard.
- Persistent Motor Noise: The return pump motor running continuously, buzzing or humming even when the vehicle is parked.
- Intermittent Speedometer Failure: Since modern instrument clusters pull vehicle speed calculations from wheel speed sensors routed through the EBCM, a malfunctioning processor can drop speedometer output entirely.
Reading the fault codes via an OBD-II diagnostic scanner will quickly narrow down the root cause:
- C1061 / C1111: ABS Pump Motor Circuit Failure / Return Pump Circuit Fault.
- C1288: Brake Pressure Transducer Primary Circuit Failure.
- C2116: ABS Pump Motor Low Supply Voltage (often pointing to internal relay failure or ground degradation).
- C123EF0: Hydraulic limit reached fault code, which indicates that the pump motor or internal pressure sensor can no longer generate or sustain expected hydraulic pressure under load.
Step-by-Step Guide to ABS Pump Reconditioning
Reconditioning an ABS pump assembly requires patience, clean conditions, and accurate bench testing. Brake fluid is hygroscopic (it absorbs water over time) and corrosive to automotive paint, while internal electronic components are sensitive to static discharge.
Safety Precautions and Workspace Preparation
- Disconnect the 12V Battery: Always disconnect the negative battery terminal before disconnecting any EBCM electrical harnesses to prevent voltage spikes from damaging the internal microprocessors.
- Depressurize and Contain Fluid: Syphon the master cylinder reservoir down before cracking brake line fittings. Use dedicated line plugs or rubber caps to seal open brake lines immediately, preventing dirt ingress and excessive fluid drain.
- Maintain Cleanroom Standards: Work on a clean, degreased bench. Even a single speck of grit inside the hydraulic valve block can jam a solenoid valve pintle seat.
Bench Testing and Electrical Diagnosis for ABS Pump Reconditioning
Before tearing down the mechanical assembly, isolate whether your issue stems from the electronic control board or the DC motor.
If you find your ABS pump running after key off, the internal solid-state motor control relay inside the EBCM has likely welded itself closed. In this scenario, pulling the under-hood ABS fuse stops battery drain until you can open the module and reflow or replace the damaged switching MOSFETs.
When evaluating the circuit board under magnification, look for micro-cracks around the high-current header pins and coil terminals. Using high-grade leaded or silver-bearing solder, carefully reflow any cold solder joints that have developed microscopic fractures due to engine heat and road vibration.
Motor Teardown and Mechanical ABS Pump Reconditioning
If the direct 12V jumper test resulted in sluggish rotation, intermittent operation, or silence from the pump motor, the mechanical drive unit must be refurbished:
- Separate the Motor from the Valve Block: Remove the Torx fasteners securing the motor housing to the aluminum hydraulic manifold. Gently work the motor free from the eccentric drive shaft bearing.
- Disassemble the Motor Casing: Uncrimp or unbolt the end cap to expose the armature, commutator ring, and carbon brush assembly.
- Clean the Commutator: Carbon dust generated from brush wear often bridges the small gaps between commutator copper segments, creating a partial short circuit. Clean the commutator using electrical contact cleaner and gently dress the surface with ultra-fine (1000-grit) sandpaper.
- Inspect and Replace Brushes: Measure brush length. If worn down near their copper braided leads, unsolder the old brushes and install fresh carbon replacements, ensuring the tension springs maintain proper contact pressure.
- Bearing Service: Inspect the drive shaft bearings for roughness or play. Clean and repack sealed high-speed bearings or press in new replacements if pitting is present.
- Hydraulic Block Flushing: Flush the mechanical valve body cavities using clean brake fluid or specialized residue-free solvent. Replace all external rubber O-rings and backup rings on the solenoid stems before reassembly.
Post-Rebuild Installation, Recoding, and Bleeding Procedures
Once the module and motor are restored, sealed against moisture, and reassembled, the unit is ready to go back into the vehicle.
Reprogramming and Coding Protocols
One significant advantage of reconditioning your vehicle's original ABS unit rather than sourcing a used or generic replacement is software continuity. Because your original EBCM retains its factory EEPROM memory, you generally avoid the need for complete module VIN coding or immobilizer pairing.
However, certain platforms require precise calibration after installation:
- Zero-Point Calibration: Calibrates internal longitudinal and lateral acceleration sensors along with the internal brake pressure transducer.
- Steering Angle Sensor Alignment: Re-synchronizes the steering column angle sensor with the ABS/ESC yaw rate calculations.
- CAN Bus Handshake Verification: Connect an advanced scan tool to ensure bidirectional communication is established across the vehicle's powertrain and chassis high-speed CAN networks with zero communication trouble codes.
Hydraulic System Flushing and Computer-Controlled Bleeding
Traditional brake bleeding methods (pumping the pedal while opening a bleeder screw) will only purge air from the primary hydraulic circuit. If air has entered the internal ABS valves or secondary low-pressure accumulators, the brake pedal will remain dangerously soft until an automated diagnostic bleed is executed.
- Connect a Pressurized Fluid Bleeder: Charge a pressure bleeder filled with fresh DOT 4 or DOT 5.1 fluid (check vehicle spec) to roughly 15–20 psi at the master cylinder reservoir.
- Initiate Automated Scan Tool Bleeding: Connect an OBD-II diagnostic scanner and enter the ABS functional test menu. Select the automated bleed routine.
- Cycle Solenoids and Run Return Pump: The scan tool will automatically trigger individual solenoid valves to cycle open and pulse the return pump, dislodging micro-bubbles trapped inside the valve seats and internal accumulators.
- Follow the Sequence: Open the bleeder screws at each caliper in the order specified by the vehicle manual (typically starting at the wheel furthest from the master cylinder: Right Rear, Left Rear, Right Front, Left Front). Continue until clean, bubble-free fluid flows steadily.
- Verify Pedal Firmness: Depress the brake pedal firmly with the engine idling. The pedal should feel rock-solid with minimal travel.
Cost Analysis: Rebuilding vs. Replacing ABS Units
Deciding between DIY reconditioning, professional remanufacturing, and brand-new OEM replacement comes down to budget, technical skill, and part availability.
| Solution Pathway | Typical Parts Cost | Labor & Diagnostics | Total Average Cost | Turnaround / Availability | Reprogramming Required? |
|---|---|---|---|---|---|
| DIY Component Rebuild | $30 – $150 (Brushes, O-rings, solder) | $0 (Self-performed) | $30 – $150 | 1 – 2 Days | No (Original unit retained) |
| Specialist Remanufacturing | £200 – £600 ($250 – $425) | $150 – $300 (R&R Labor) | $400 – $750 | 2 – 5 Business Days | No (Original data preserved) |
| New OEM Replacement (Standard) | $1,020 – $1,090 | $223 – $327 | $1,181 – $1,417 | Days to weeks (Backorders) | Yes (Full dealer coding required) |
| New OEM Replacement (Luxury/Euro) | $1,630+ | $314 – $460 | $1,944 – $2,091+ | Weeks (Dealer order only) | Yes (Software & module pairing) |
Reconditioning or remanufacturing an ABS unit delivers clear financial and environmental benefits:
- Significant Cost Savings: Choosing to recondition an existing unit typically yields savings of 40% to 70% compared to purchasing brand-new OEM hardware from a dealership parts counter.
- No Backorder Delays: Many older or low-production ABS modules are discontinued or stuck on indefinite manufacturer backorders. Rebuilding avoids sourcing delays.
- Preserved Calibration: Retaining your original module prevents costly dealer diagnostic fees for recoding and module pairing.
- Reduced Electronic Waste: Extending the service life of heavy aluminum blocks, copper motor windings, and micro-circuit boards keeps hazardous electronic waste out of landfills.
Frequently Asked Questions About ABS Pump Repair
How long does a reconditioned ABS pump typically last?
A properly reconditioned ABS pump will often last the remaining operational life of the vehicle. Specialized rebuilders report company-wide defect rates as low as 0.49% across tens of thousands of serviced units. Because reconditioning targets the root causes of failure—replacing low-tolerance factory solder joints, upgrading high-temperature carbon brushes, and renewing internal seals with superior elastomeric compounds—the restored unit frequently exceeds original factory durability. Regular brake fluid flushes every two years will protect your rebuilt hydraulic valves from internal moisture corrosion.
Can I drive my vehicle while the ABS pump is removed?
You should never drive a vehicle with the ABS pump or hydraulic block removed. Removing the hydraulic unit leaves open brake lines, resulting in a total loss of brake fluid pressure and leaving the vehicle with zero stopping capability. Even if the hydraulic lines were bypassed with temporary unions, the vehicle's electronic brake force distribution (EBD) logic would be disabled, causing the rear wheels to lock up prematurely during moderate braking and creating an extreme spin-out hazard.
Why does my ABS pump keep running after the ignition is turned off?
When an ABS pump motor continues to hum or buzz after the ignition key is switched off, the cause is almost always an internal electrical short circuit within the EBCM. The solid-state motor driver or electromechanical relay responsible for switching power to the high-draw pump motor has welded its internal contacts together under electrical load. To prevent the pump motor from burning out or draining your 12V battery completely, immediately locate your vehicle’s engine bay fuse block and pull the primary ABS pump fuse (typically 30A to 50A) until the unit can be removed and repaired.
Conclusion
Restoring an anti-lock braking system requires precision, thorough testing, and clean mechanical work. By carefully diagnosing trouble codes, addressing motor wear or circuit board solder fractures, and executing a complete automated diagnostic bleed, you can restore safe, reliable braking performance while saving hundreds of dollars over dealership replacement costs.
If your vehicle requires advanced diagnostics, specialized module repairs, or a complete hydraulic service, our experienced team at Porters Automotive is here to help. With convenient service locations in Tallahassee, FL, Quincy, FL, and Bradfordville, FL, we provide professional diagnostics and dependable automotive repair solutions to keep you driving safely.